2022年の8月に、GA4のイベントタグの「詳細設定」に「『e コマース』 『e コマースデータを送信』」が実装されました。
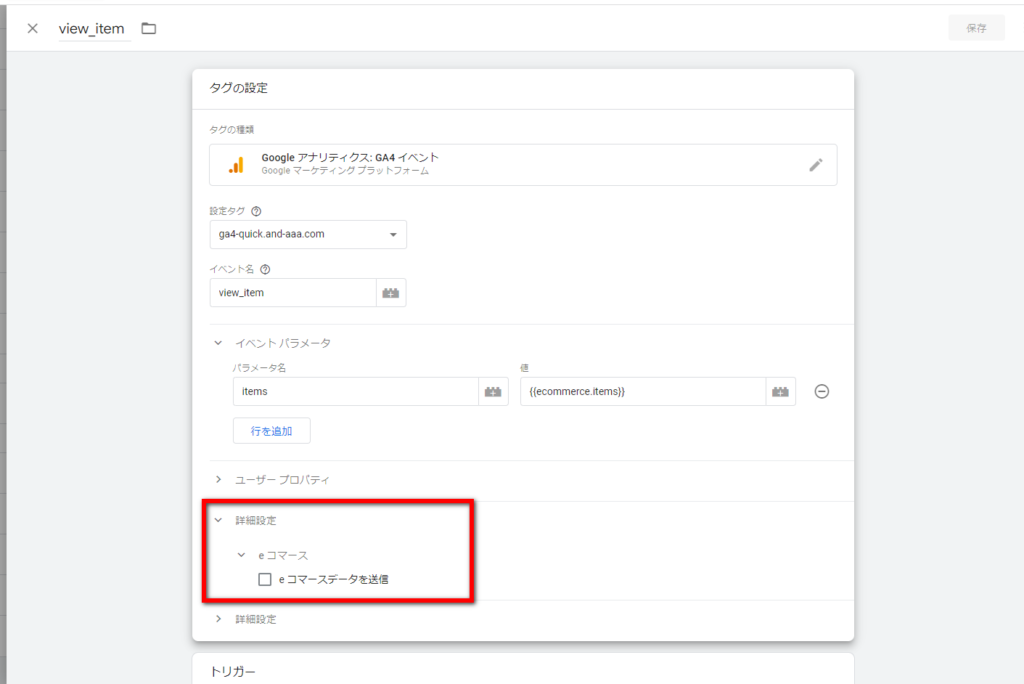
GA4のイベントタグの「詳細設定」に「『e コマース』 『e コマースデータを送信』」が実装されました。
これまでは、GTMによるGA4のeコマースのイベント設定では、「変数」を設定し、それをカスタム イベントタグの「イベント パラメータ」に設定する必要がありました。今後は、Google推奨のeコマースの変数(後述)で適切なデータレイヤーの記述を行えば、「変数の設定」もカスタムイベントタグの「イベント パラメータ」の設定も不要になりました。
eコマースの「推奨イベント」
eコマースの「推奨イベント」は下記の通りです。
| イベント | この記事に設定方法の解説がある? | 発火タイミング |
|---|---|---|
| add_payment_info | 支払い情報送信 | |
| add_shipping_info | 配送情報送信 | |
| add_to_cart | Yes | カートに商品を追加 |
| add_to_wishlist | 欲しい物リストに商品を追加 | |
| begin_checkout | Yes | 購入手続きを開始 |
| generate_lead | 問い合わせのためにフォームまたはリクエストを送信した時 | |
| purchase | Yes | 購入完了 |
| refund | Yes | 払い戻し実行 |
| remove_from_cart | Yes | カートから商品を削除 |
| select_item | Yes | リストから商品を選択 |
| select_promotion | Yes | プロモーションを選択 |
| view_cart | カートを表示 | |
| view_item | Yes | 商品詳細を表示 |
| view_item_list | Yes | 商品一覧を表示 |
| view_promotion | Yes | プロモーションが表示された |
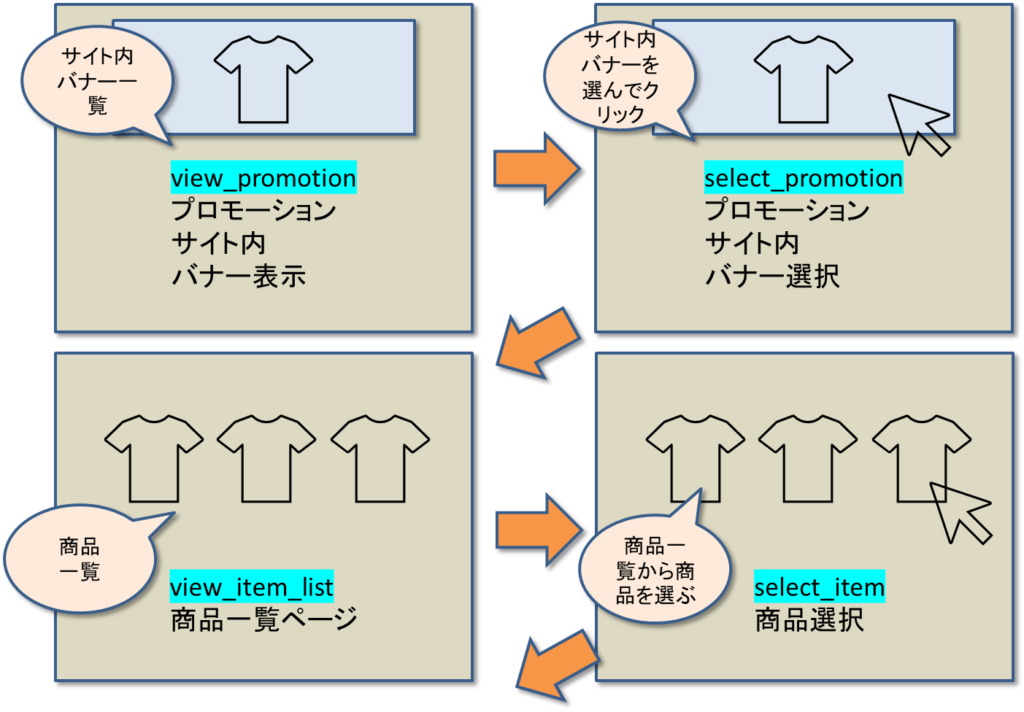
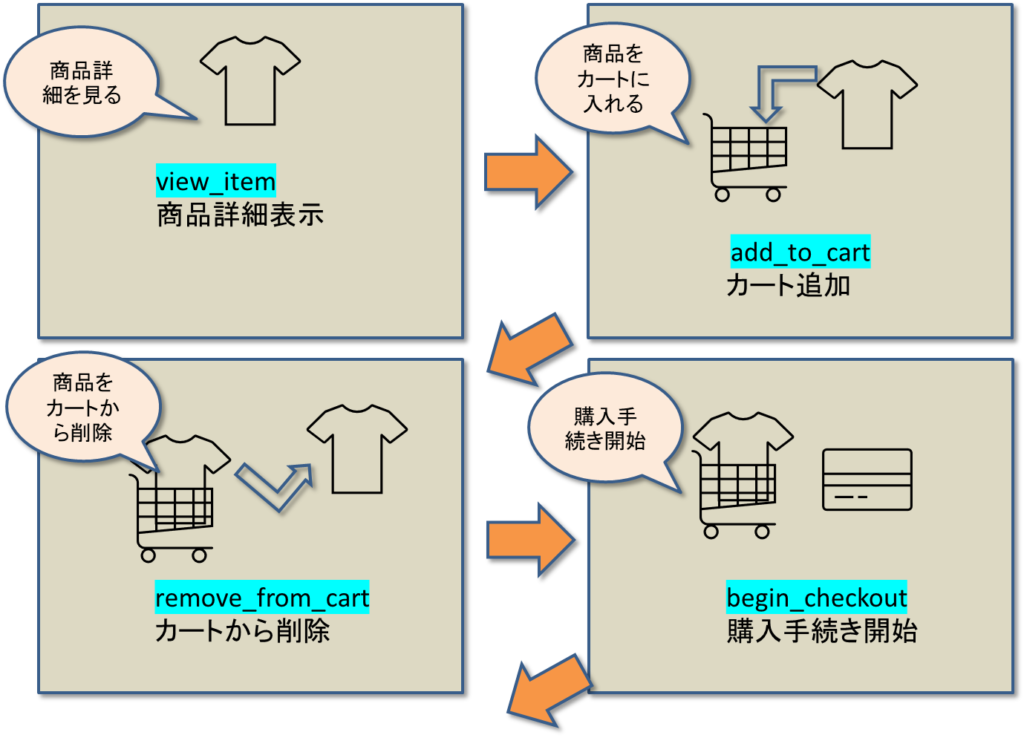
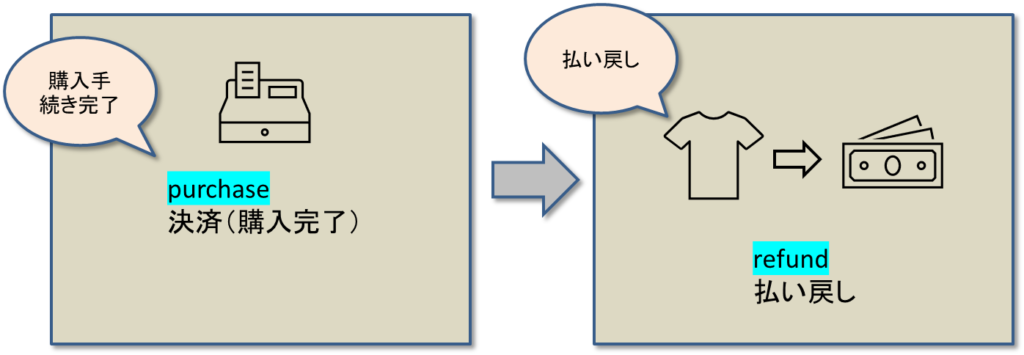
ECに関わるイベントの流れの例
ECのイベントは上記すべてを計測する必要はありません。サイトの実情に合わせて、必要なものを組み合わせます。たとば、例として下記のような流れが考えられます。
上記の各イベントに「パラメータ」「itemパラメータ」が紐づきます。
GA4のデータは「イベント」と「パラメータ」で構成されていますが、eコマースのデータは「推奨イベント」「パラメータ」の他に商品情報を「itemパラメータ」(後述)で取得します。(2022年8月28日時点では「itemパラメータ」で取得したデータを「カスタム ディメンション」に登録できません。スコープ「商品」で「カスタム ディメンション」を設定することが出来ないためです。GA4のデフォルトで用意されているディメンションを使用する必要があります。)
eコマースの「パラメータ」
| パラメータ名 | タイプ | 必須 | サンプルの値 | 説明 |
|---|---|---|---|---|
| currency | string | ○* | JPY | イベントに関連付けられた商品アイテムの通貨(3 文字の ISO 4217 形式)。 * 収益の指標が正確に計算されるように currency を指定する必要があります。 |
| value | number | ○* | 10000 | 金額合計。イベントの金銭的価値。 * 収益の指標が正確に計算されるように currency を指定する必要があります。 |
| coupon | string | – | Summer01 | イベントに関連づけられたクーポンの名前。 |
| payment_type | string | – | Credit Card | 支払い方法 |
| shipping_tier | string | – | Yamato | 購入された商品アイテムの配送方法 |
| affiliation | string | – | Google Store | 仕入れ先業者や実店舗を指定する商品アフィリエーション。 |
| shipping | string | – | 700 | 送料 |
| transaction_id | string | ○ | T_12345 | 取引、注文ID |
| tax | string | – | 800 | 税金 |
| item_list_id | string | – | w01 | 商品が表示されたリストの ID |
| item_list_name | string | – | Wish_List | 商品が表示されたリストの名前 |
| creative_name | string | – | Summer_GIG_01 | プロモーションのクリエイティブの名前 |
| creative_slot | string | – | featured_app_1 | 商品アイテムに関連付けられたプロモーション用のクリエイティブ スロットの名前。 |
| location_id | string | – | L_12345 | 商品アイテムに関連付けられた場所。関連するアイテムに対応する Google プレイス ID を使用することをおすすめします。カスタムの地域 ID も使用できます。 |
| promotion_id | string | – | P_12345 | プロモーションの ID |
| promotion_name | string | – | Summer Sale | プロモーションの名前 |
eコマースの「itemパラメータ」
サンプルは、下記を参考にしました。
https://developers.google.com/tag-manager/ecommerce-ga4?hl=ja#measure_viewsimpressions_of_productitem_details
| itemパラメータ名 | タイプ | 必須 | サンプルの値 | 説明 |
|---|---|---|---|---|
| item_id | string | 〇* | SKU_12345 | 商品アイテムの ID。 * item_id または item_name が必要です。 |
| item_name | string | 〇* | Stan and Friends Tee | 商品アイテムの名前。 * item_id または item_name が必要です。 |
| price | number | – | 10000 | 指定された通貨パラメータの単位で表した商品アイテムの価格。 |
| quantity | number | – | 1 | 商品アイテムの数量 |
| affiliation | string | – | Google Store | 商品元や店舗を指定する商品アフィリエーション |
| coupon | string | – | SUMMER_FUN | 商品に関連したクーポン名 |
| currency | string | – | JPY | 通貨(3 文字の ISO 4217 形式) |
| discount | number | – | 100 | 商品に対する割引額 |
| item_variant | string | – | green | 商品アイテムのバリエーションまたは固有のコード、あるいはその他の詳細やオプションに関する説明 |
| item_brand | string | – | Amazon | 商品アイテムのブランド |
| item_category | string | – | Apparel | 商品アイテムのカテゴリや分類 |
| item_category2 | string | – | Adult | 商品アイテムのカテゴリや分類 |
| item_category3 | string | – | Shirts | 商品アイテムのカテゴリや分類 |
| item_category4 | string | – | Crew | 商品アイテムのカテゴリや分類 |
| item_category5 | string | – | Short sleeve | 商品アイテムのカテゴリや分類 |
| index | number | – | 3 | リスト内の商品アイテムのインデックスまたは位置 |
| item_list_id | string | – | related_products | ユーザーに商品アイテムが表示されたリストの ID。 |
| item_list_name | string | – | Related products | ユーザーに商品アイテムが表示されたリストの名前。 |
| location_id | string | – | L_12345 | 商品アイテムに関連付けられた場所。関連するアイテムに対応する Google プレイス ID を使用するか、カスタムの地域 ID も使用できます。 |
| promotion_id | string | – | P_12345 | 商品アイテムに関連付けられたプロモーションの ID。 |
| promotion_name | string | – | Summer Sale | 商品アイテムに関連付けられたプロモーションの名前。 |
Google推奨のeコマースの変数については、こちらをご参照ください。
e コマース(GA4)デベロッパー ガイド
https://developers.google.com/tag-manager/ecommerce-ga4?hl=ja
1. view_item GTMイベント設定
まずは、view_itemについて、見てみます。
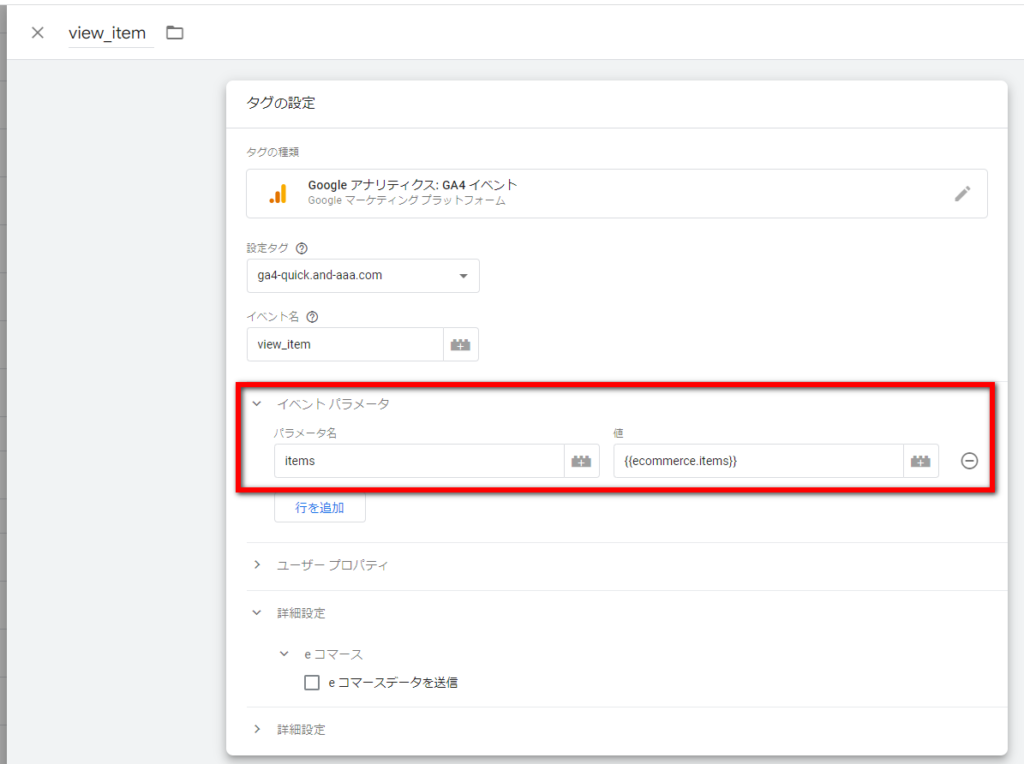
変数とパラメータの設定が必要だった時は、view_itemのイベントタグの設定は上記にようになっていました。
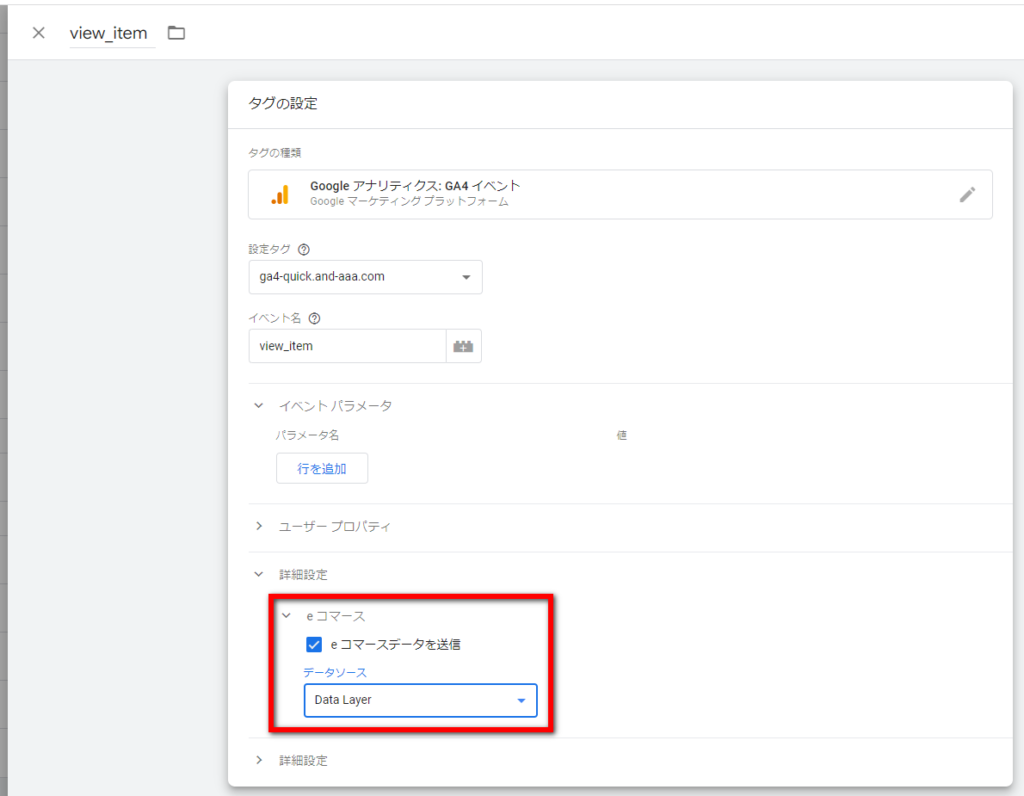
現在の設定方法では、Google推奨のeコマースの変数を使っていれば、変数の設定が不要となります。また、イベントタグに「イベント パラメータ」を記述する必要もありません。「e コマースデータを送信」にチェックを入れて、データソースは「Data Layer」を選択します。
イベント view_item のトリガー
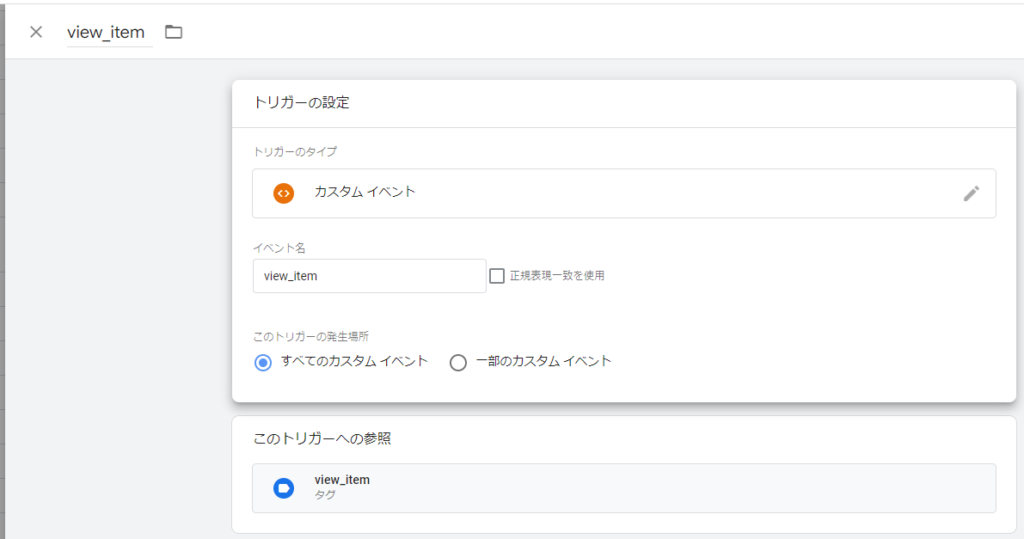
トリガーのタイプは、「カスタム イベント」を使用しています。
view_itemのデータレイヤーのサンプルは下記の通りです。
データレイヤーに適切な値が出力されるようにするには、システム開発が必要です。
<script>
window.dataLayer = window.dataLayer || [];
dataLayer.push({ ecommerce: null });
dataLayer.push({ event: "view_item",
ecommerce: {
  items: [{
    item_name: "Donut Friday Scented ",
    item_id: "ii20220829_0933",
    price: 10000,
    item_brand: "Google",
    item_category: "Apparel",
    item_category2: "Mens",
    item_category3: "Shirts",
    item_category4: "Tshirts",
    item_variant: "Black",
    item_list_name: "Search Results",
    item_list_id: "SR123",
    index: 1,
    quantity: 1
  }]
} });
</script>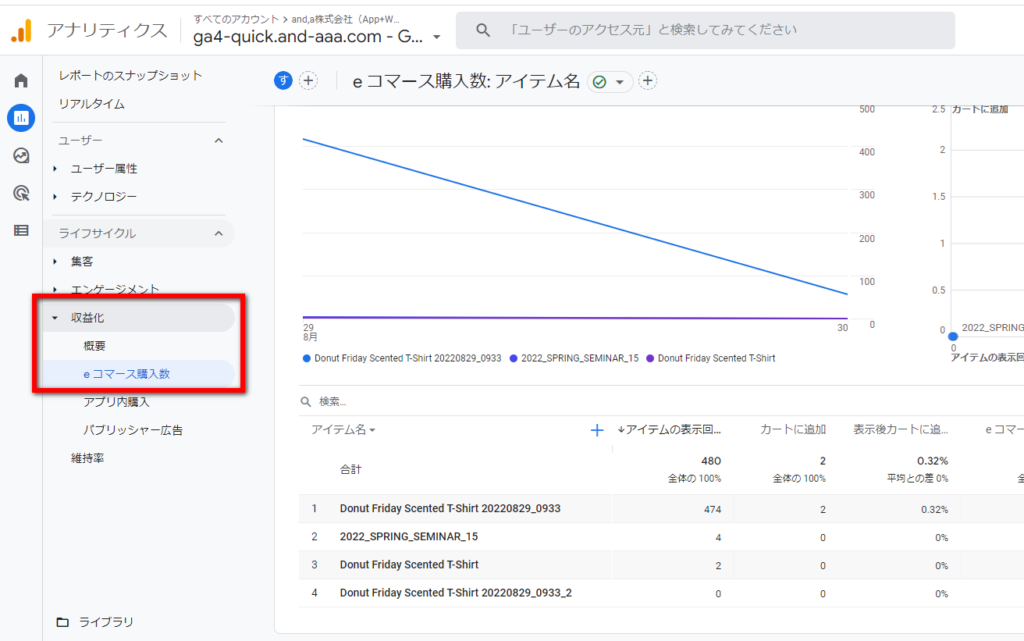
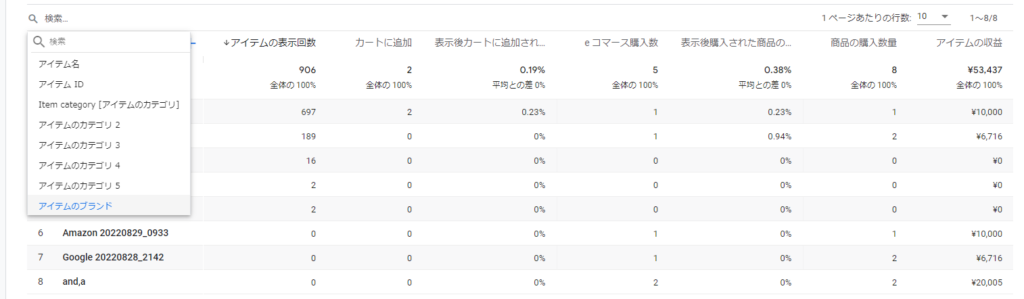
レポート > ライフサイクル > 収益化 > eコマース購入数
にて、翌日以降データを確認すると、
view_itemイベントで、「アイテム名」「アイテム ID」「アイテムのカテゴリ」「アイテムのカテゴリ 2~5」「アイテムのブランド」が計測できていることが確認できます。
2. purchase GTMイベント設定
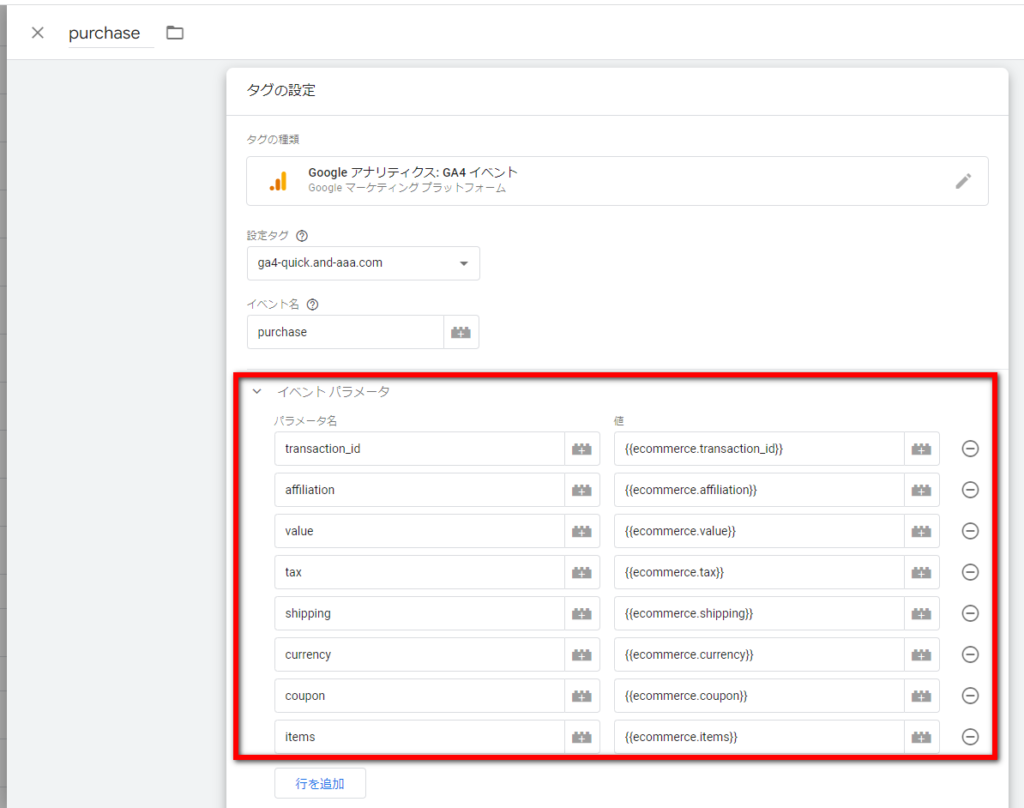
変数とパラメータの設定が必要だった時は、purchaseのイベントタグの設定は上記にようになっていました。
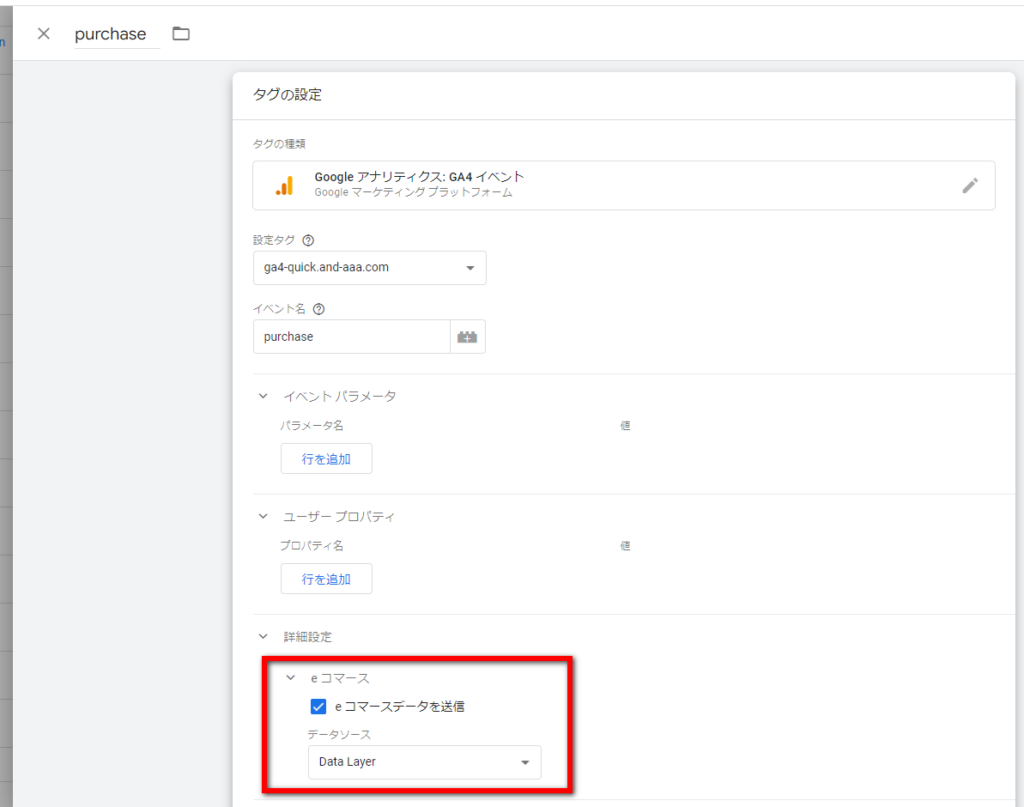
(繰り返しになりますが、)現在の設定方法では、Google推奨のeコマースの変数を使っていれば、変数の設定が不要となります。また、イベントタグに「イベント パラメータ」を記述する必要もありません。「e コマースデータを送信」にチェックを入れて、データソースは「Data Layer」を選択します。
イベント purchase のトリガー
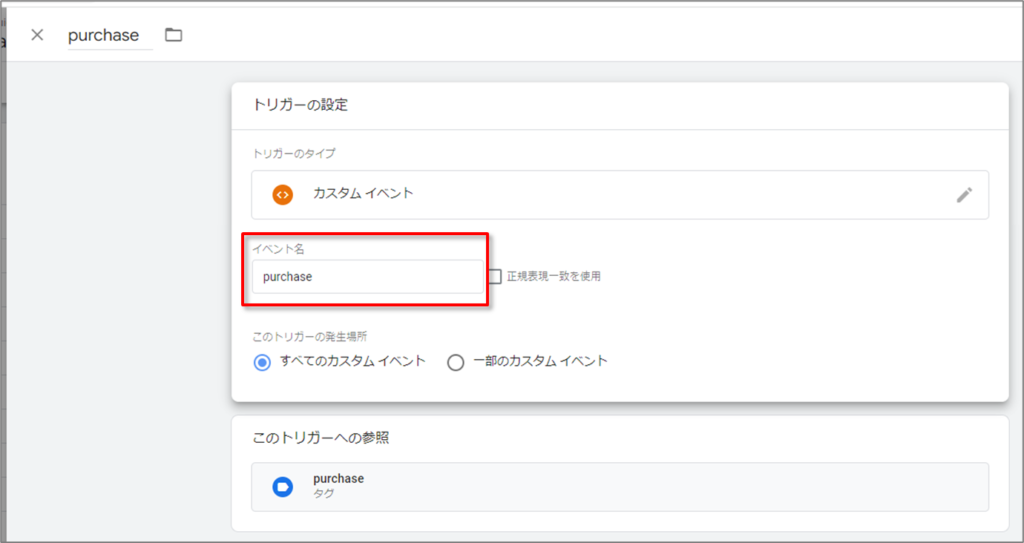
トリガーのタイプは、「カスタム イベント」を使用しています。
purchaseのデータレイヤーのサンプルは下記の通りです。
<script>
window.dataLayer = window.dataLayer || [];
dataLayer.push({ ecommerce: null });
dataLayer.push({event: "purchase",
  ecommerce: {
    transaction_id: "T20220829_0933",
    affiliation: "Online Store",
    value: "20000",
    tax: "1600",
    shipping: "1000",
    currency: "JPY",
    coupon: "SUMMER_SALE",
    items: [{
      item_name: "Donut Friday Scented T-Shirt",
      item_id: "ii20220829_0933",
      price: 10000,
      item_brand: "Google",
      item_category: "Apparel",
      item_variant: "Black",
      quantity: 1
    }, {
      item_name: "Donut Friday Scented T-Shirt",
      item_id: "ii20220829_0933_2",
      price: 10000, item_brand: "Amazon",
      item_category: "Apparel",
      item_variant: "Red",
      quantity: 1
    }]
  }
});
</script>
3. view_promotion GTMイベント設定
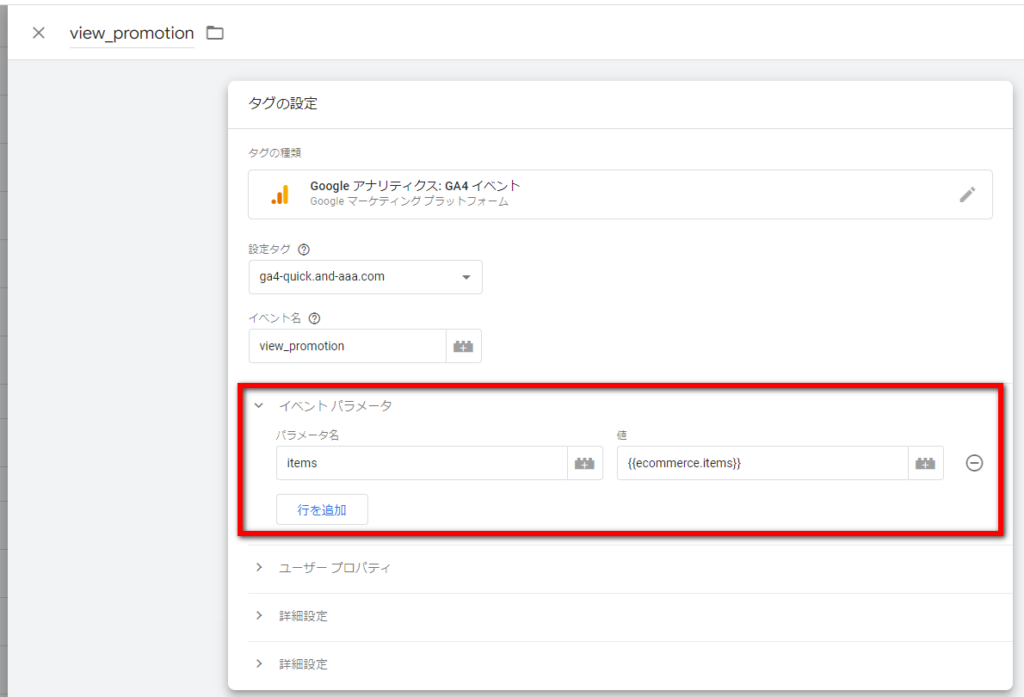
変数とパラメータの設定が必要だった時は、view_promotionのイベントタグの設定は上記にようになっていました。
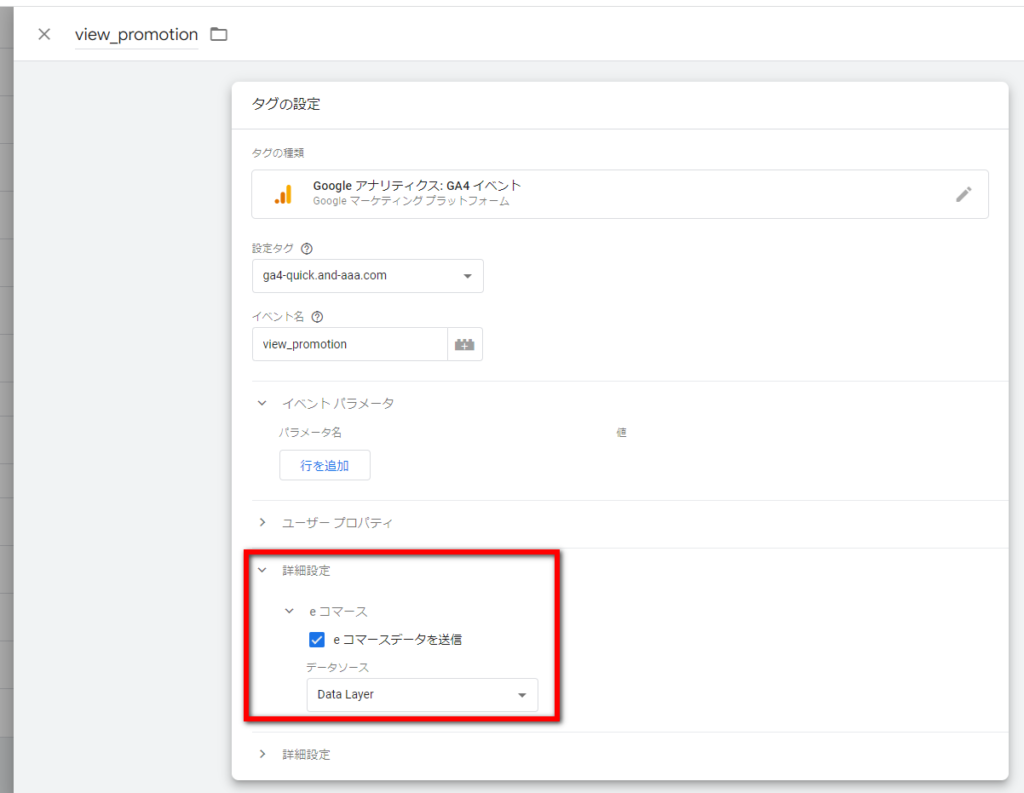
(繰り返しになりますが、)現在の設定方法では、Google推奨のeコマースの変数を使っていれば、変数の設定が不要となります。また、イベントタグに「イベント パラメータ」を記述する必要もありません。「e コマースデータを送信」にチェックを入れて、データソースは「Data Layer」を選択します。
イベント view_promotion のトリガー
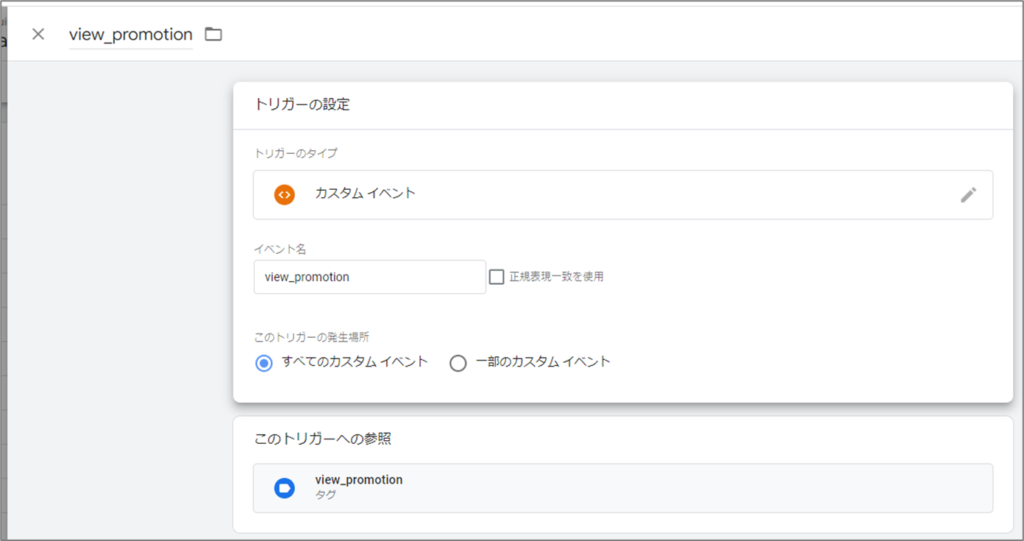
トリガーのタイプは、「カスタム イベント」を使用しています。
view_promotionのデータレイヤーのサンプルは下記の通りです。
<script>
window.dataLayer = window.dataLayer || [];
dataLayer.push({ ecommerce: null });
dataLayer.push({
  event: "view_promotion",
  ecommerce: {
    items: [{
      item_name: "Donut Friday Scented T-Shirt",
      item_id: "ii20220829_0933",
      price: 10000,
      item_brand: "Google",
      item_category: "Apparel",
      item_category2: "Mens",
      item_category3: "Shirts",
      item_category4: "Tshirts",
      item_variant: "Black",
      promotion_id: "abc123",
      promotion_name: "summer_promo",
      creative_name: "instore_suummer",
      creative_slot: "1",
      location_id: "hero_banner",
      index: 1,
      quantity: 1
    }]
  }
});
</script>
4. select_promotion GTMイベント設定
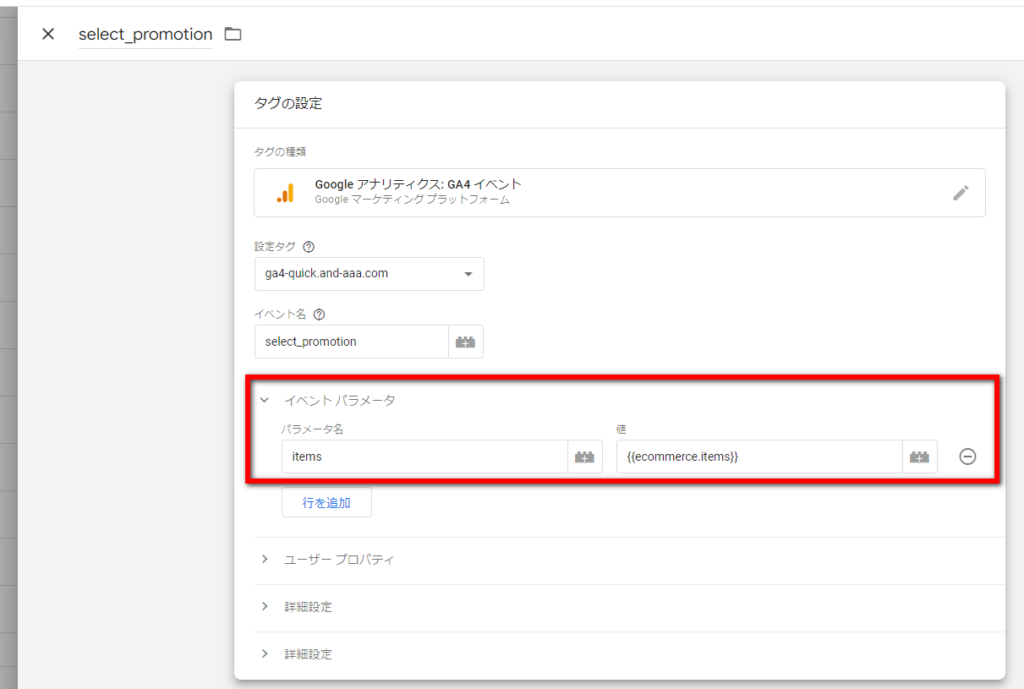
変数とパラメータの設定が必要だった時は、select_promotionのイベントタグの設定は上記にようになっていました。
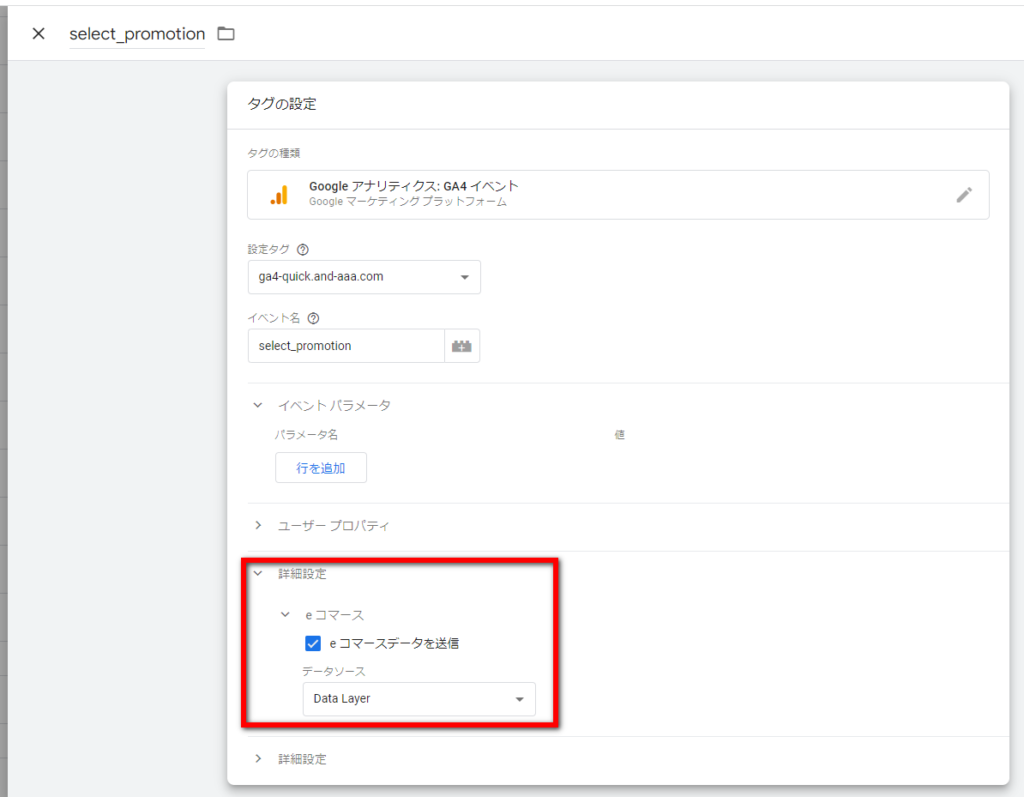
(繰り返しになりますが、)現在の設定方法では、Google推奨のeコマースの変数を使っていれば、変数の設定が不要となります。また、イベントタグに「イベント パラメータ」を記述する必要もありません。「e コマースデータを送信」にチェックを入れて、データソースは「Data Layer」を選択します。
イベント select_promotion のトリガー
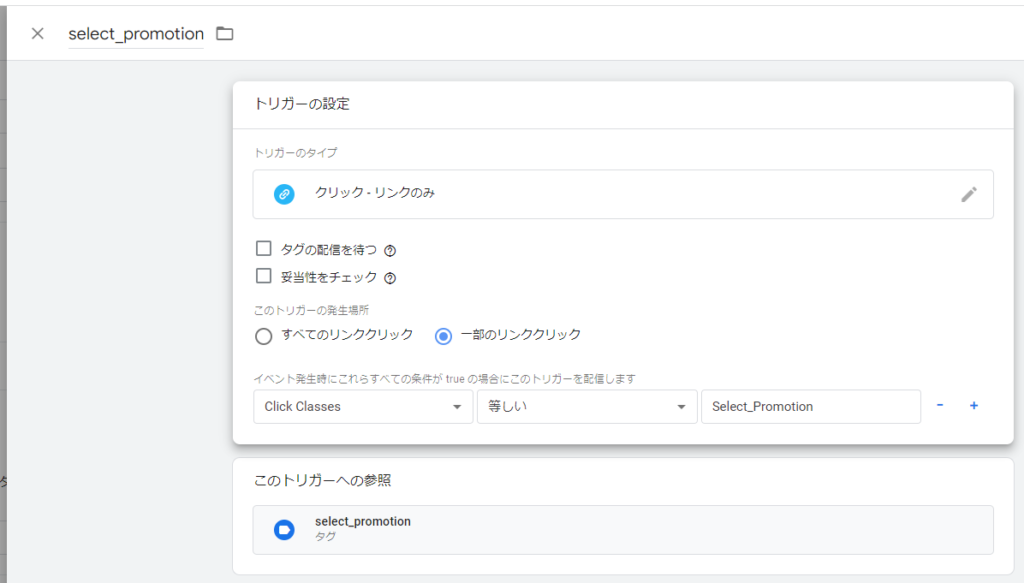
トリガーは「クリック – リンクのみ」を使用しています。
トリガーの「Click Classess 等しい Select_Promotion」の「Select_Promotion」は、下記のselect_promotionのHTMLのソースのサンプルに記述してあります。
「select_promotion」のHTMLのソースのサンプルは下記の通りです。view_promotion.pngというボタンがクリックされると、必要なデータレイヤーが生成されるようになっています。下記の例はあくまでもサンプルで、記述方法は、ウェブサイトの実装担当の方にご相談ください。
<html lang="ja">
<head>

<script>
function onPromotionClick() {

  var dataset = JSON.parse(JSON.stringify(this.dataset));
  var item = Object.getOwnPropertyNames(dataset).reduce(function(prev, current) {
    var key = current.replace(/[A-Z]/g, function(char){ return '_' + char.toLowerCase();});
    prev[key] = /price|index|quantity/.test(key) ? Number(dataset[current]) : dataset[current];
    return prev
  }, {});

  dataLayer.push({ ecommerce: null });
  dataLayer.push({
    event: "select_promotion",
    ecommerce: {
      items: [ item ]
    }
  });
}
</script>

<!-- Google Tag Manager -->
<script>(function(w,d,s,l,i){w[l]=w[l]||[];w[l].push({'gtm.start':
new Date().getTime(),event:'gtm.js'});var f=d.getElementsByTagName(s)[0],
j=d.createElement(s),dl=l!='dataLayer'?'&l='+l:'';j.async=true;j.src=
'https://www.googletagmanager.com/gtm.js?id='+i+dl;f.parentNode.insertBefore(j,f);
})(window,document,'script','dataLayer','GTM-WKLP4D3');</script>
<!-- End Google Tag Manager -->

<meta charset="utf-8" />
<link rel="stylesheet" href="css/general.css"/>
<title>EC_select_promotion | EC_test</title>
</head>

<body>

<!-- Google Tag Manager (noscript) -->
<noscript><iframe src="https://www.googletagmanager.com/ns.html?id=GTM-WKLP4D3"
height="0" width="0" style="display:none;visibility:hidden"></iframe></noscript>
<!-- End Google Tag Manager (noscript) -->

<h1>ECテスト select_promotion</h1>

<p>
<a class="Select_Promotion" href="view_item_list.html"
  data-item-name="Donut Friday Scented T-Shirt"
  data-item-id="ii20220829_0933"
  data-price=10000
  data-item_brand: "Google",
  data-item_category: "Apparel",
  data-item_category2: "Mens",
  data-item_category3: "Shirts",
  data-item_category4: "Tshirts",
  data-item_variant: "Black",
  data-promotion_id: "abc123",
  data-promotion_name: "summer_promo",
  data-creative_name: "instore_suummer",
  data-creative_slot: "1",
  data-index="1"
  data-quantity="1"
  onclick="onPromotionClick()"
><img src="images/view_promotion.png"></a>
</p>

</body>
</html>
5. view_item_list GTMイベント設定
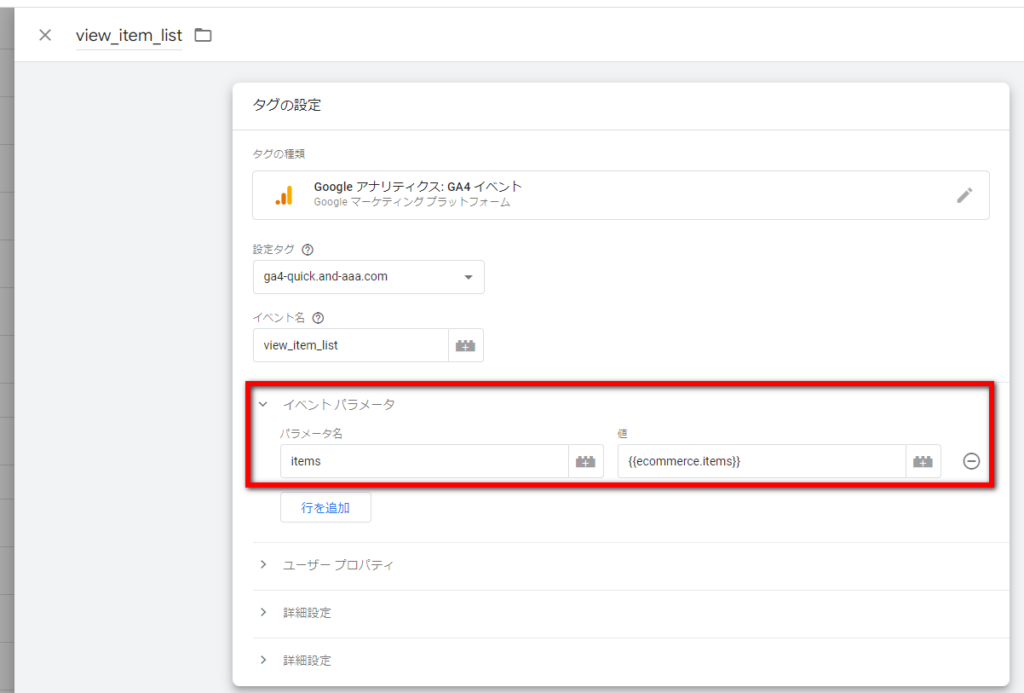
変数とパラメータの設定が必要だった時は、view_item_listのイベントタグの設定は上記にようになっていました。
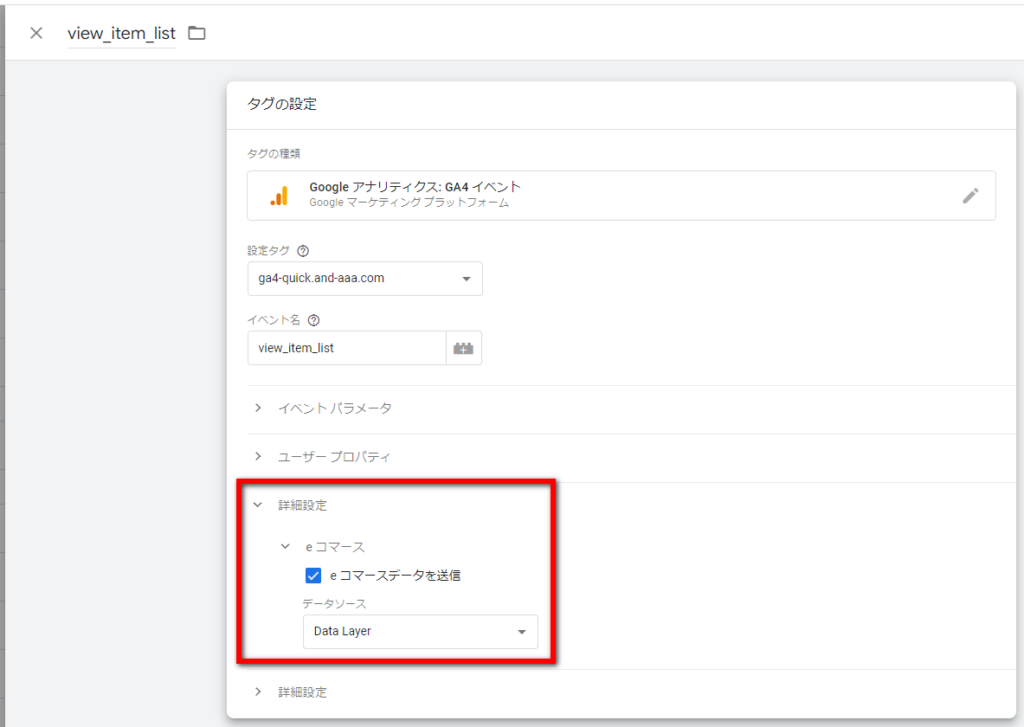
(繰り返しになりますが、)現在の設定方法では、Google推奨のeコマースの変数を使っていれば、変数の設定が不要となります。また、イベントタグに「イベント パラメータ」を記述する必要もありません。「e コマースデータを送信」にチェックを入れて、データソースは「Data Layer」を選択します。
イベント view_item_list のトリガー
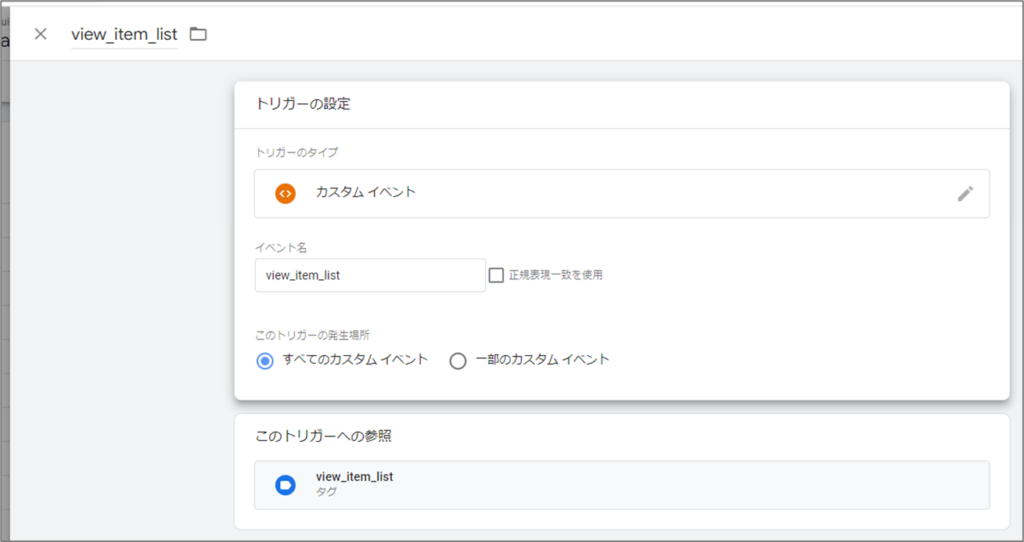
トリガーのタイプは、「カスタム イベント」を使用しています。
view_item_listのデータレイヤーのサンプルは下記の通りです。
<script>
window.dataLayer = window.dataLayer || [];
// Measure product views / impressions
dataLayer.push({ ecommerce: null });  // Clear the previous ecommerce object.
dataLayer.push({
  event: "view_item_list",
  ecommerce: {
    items: [
    {
      item_name: "Donut Friday Scented T-Shirt",
      item_id: "ii20220829_0933",
      price: 10000,
      item_brand: "Google",
      item_category: "Apparel",
      item_category2: "Mens",
      item_category3: "Shirts",
      item_category4: "Tshirts",
      item_variant: "Black",
      item_list_name: "Search Results",
      item_list_id: "SR123",
      index: 1,
      quantity: 1
    },
    {
      item_name: "Donut Friday Scented T-Shirt_2",
      item_id: "ii20220829_0933_2",
      price: 10000,
      item_brand: "Amazon",
      item_category: "Apparel_2",
      item_category2: "Mens_2",
      item_category3: "Shirts_2",
      item_category4: "Tshirts_2",
      item_variant: "Red",
      item_list_name: "Search Results_2",
      item_list_id: "SR123_2",
      index: 2,
      quantity: 1
    }]
  }
});
</script>
6. select_item GTMイベント設定

変数とパラメータの設定が必要だった時は、select_itemのイベントタグの設定は上記にようになっていました。
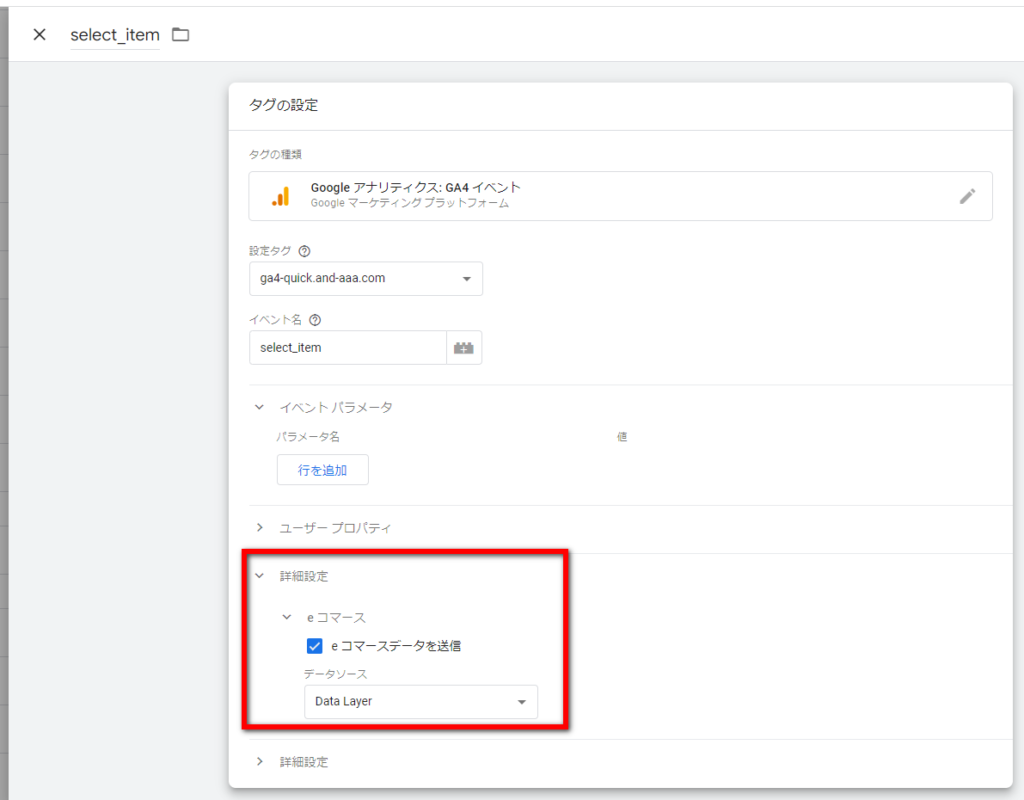
(繰り返しになりますが、)現在の設定方法では、Google推奨のeコマースの変数を使っていれば、変数の設定が不要となります。また、イベントタグに「イベント パラメータ」を記述する必要もありません。「e コマースデータを送信」にチェックを入れて、データソースは「Data Layer」を選択します。
イベント select_item のトリガー
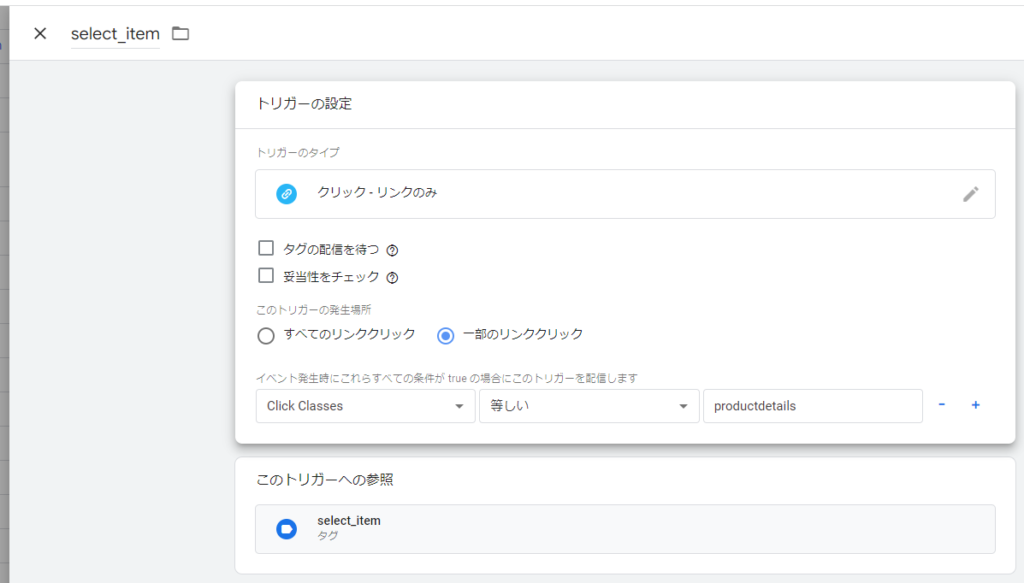
トリガーは「クリック – リンクのみ」を使用しています。
トリガーの「Click Classess 等しい productdetails」の「Select_Promotion」は、下記のselect_itemのHTMLのソースのサンプルに記述してあります。
「select_item」のHTMLのソースのサンプルは下記の通りです。「Donut Friday Scanted T-Shirt」というリンクがクリックされると、必要なデータレイヤーが生成されるようになっています。下記の例はあくまでもサンプルで、記述方法は、ウェブサイトの実装担当の方にご相談ください。
<html lang="ja" >
<head>


<script>
function onProductClick() {

  var dataset = JSON.parse(JSON.stringify(this.dataset));
  var item = Object.getOwnPropertyNames(dataset).reduce(function(prev, current) {
    var key = current.replace(/[A-Z]/g, function(char){ return '_' + char.toLowerCase();});
    prev[key] = /price|index|quantity/.test(key) ? Number(dataset[current]) : dataset[current];
    return prev
  }, {});
  window.dataLayer = window.dataLayer || [];
  dataLayer.push({ ecommerce: null });
  dataLayer.push({
    event: "select_item",
    ecommerce: {
      items: [ item ]
    }
  });
}
</script>

<!-- Google Tag Manager -->
<script>(function(w,d,s,l,i){w[l]=w[l]||[];w[l].push({'gtm.start':
new Date().getTime(),event:'gtm.js'});var f=d.getElementsByTagName(s)[0],
j=d.createElement(s),dl=l!='dataLayer'?'&l='+l:'';j.async=true;j.src=
'https://www.googletagmanager.com/gtm.js?id='+i+dl;f.parentNode.insertBefore(j,f);
})(window,document,'script','dataLayer','GTM-WKLP4D3');</script>
<!-- End Google Tag Manager -->

<meta charset="utf-8" />
<link rel="stylesheet" href="css/general.css"/>
<title>EC_select_item | EC_test</title>
</head>

<body>

<!-- Google Tag Manager (noscript) -->
<noscript><iframe src="https://www.googletagmanager.com/ns.html?id=GTM-WKLP4D3"
height="0" width="0" style="display:none;visibility:hidden"></iframe></noscript>
<!-- End Google Tag Manager (noscript) -->

<h1>ECテスト select_item</h1>

<p>
<a class="productdetails" href="items/productdetails.html"
  data-item-name="Donut Friday Scented T-Shirt"
  data-item-id="ii20220829_0933"
  data-price="10000"
  data-item-brand="Google"
  data-item-category="Apparel"
  data-item-category2="Mens"
  data-item-category3="Shirts"
  data-item-category4="Tshirts"
  data-variant="Black"
  data-item-list-name="Search Results"
  data-item-list-id="SR123"
  data-index="1"
  data-quantity="1"
  onclick="onProductClick()"
>Donut Friday Scanted T-Shirt</a>
</p>

</body>
</html>
7. add_to_cart GTMイベント設定
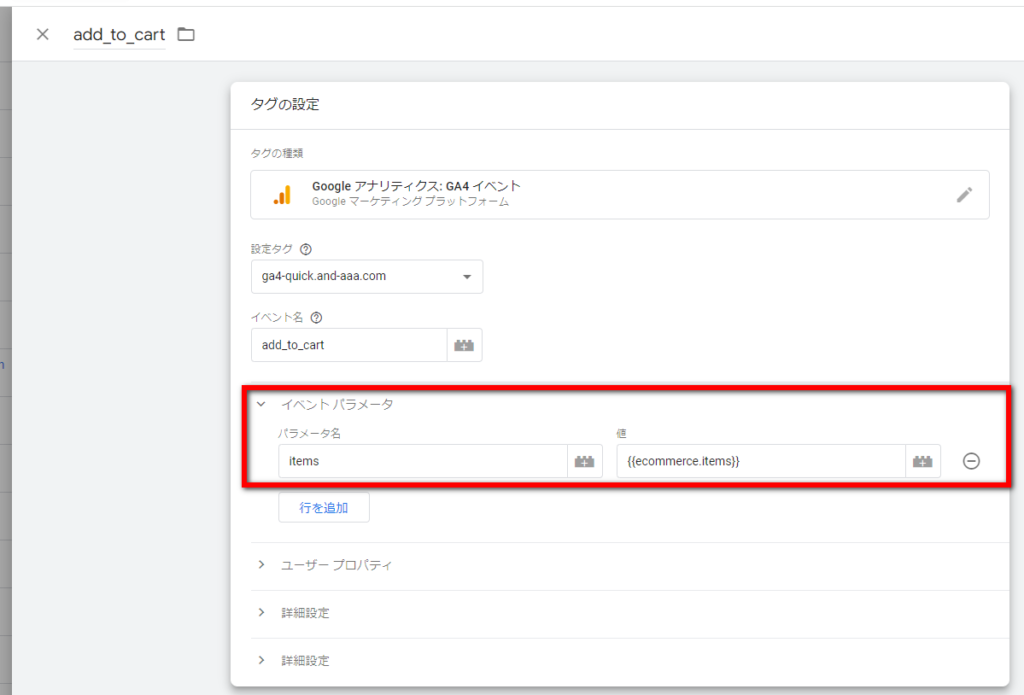
変数とパラメータの設定が必要だった時は、add_to_cartのイベントタグの設定は上記にようになっていました。

(繰り返しになりますが、)現在の設定方法では、Google推奨のeコマースの変数を使っていれば、変数の設定が不要となります。また、イベントタグに「イベント パラメータ」を記述する必要もありません。「e コマースデータを送信」にチェックを入れて、データソースは「Data Layer」を選択します。
イベント select_item のトリガー
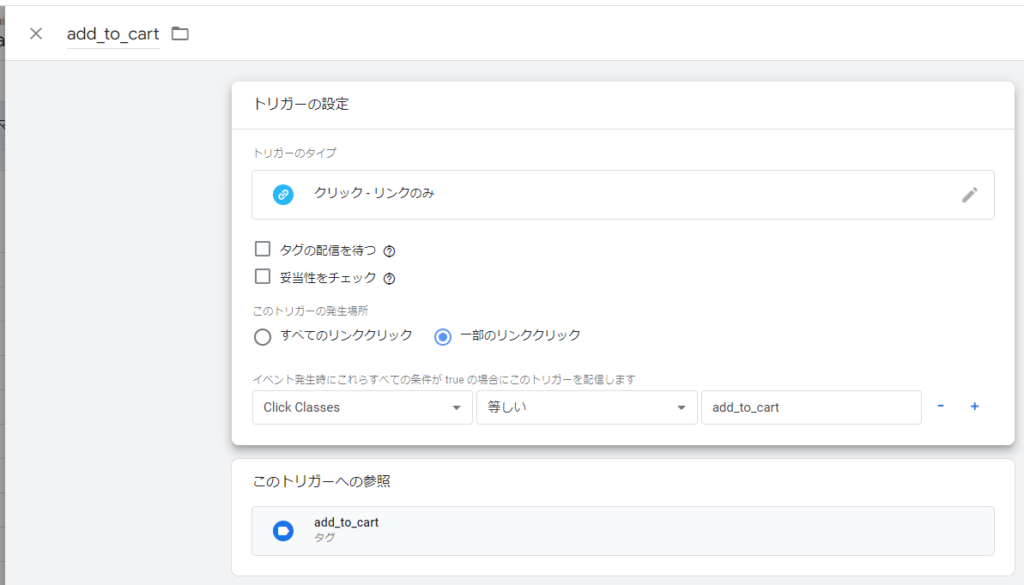
トリガーは「クリック – リンクのみ」を使用しています。
トリガーの「Click Classess 等しい add_to_cart」の「add_to_cart」は、下記のadd_to_cartのHTMLのソースのサンプルに記述してあります。
「add_to_cart」のHTMLのソースのサンプルは下記の通りです。
<a class="add_to_cart" href="cart/cart.html"><strong>Donut Friday Scented T-Shirt</strong>をカートに入れる</a>という記述内の、「class=”add_to_cart”」の部分をトリガーが見ています。
下記の例はあくまでもサンプルで、記述方法は、ウェブサイトの実装担当の方にご相談ください。
<html lang="ja" >
<head>
<script>
window.dataLayer = window.dataLayer || [];
// Measure when a product is added to a shopping cart
dataLayer.push({ ecommerce: null }); // Clear the previous ecommerce object.
dataLayer.push({
event: "add_to_cart",
ecommerce: {
items: [{
item_name: "Donut Friday Scented T-Shirt",
item_id: "ii20220829_0933",
price: 10000,
item_brand: "Google",
item_category: "Apparel",
item_category2: "Mens",
item_category3: "Shirts",
item_category4: "Tshirts",
item_variant: "Black",
item_list_name: "Search Results",
item_list_id: "SR123",
index: 1,
quantity: 1
}]
}
});
</script>
<!-- Google Tag Manager -->
<script>(function(w,d,s,l,i){w[l]=w[l]||[];w[l].push({'gtm.start':
new Date().getTime(),event:'gtm.js'});var f=d.getElementsByTagName(s)[0],
j=d.createElement(s),dl=l!='dataLayer'?'&l='+l:'';j.async=true;j.src=
'https://www.googletagmanager.com/gtm.js?id='+i+dl;f.parentNode.insertBefore(j,f);
})(window,document,'script','dataLayer','GTM-WKLP4D3');</script>
<!-- End Google Tag Manager -->
<meta charset="utf-8" />
<link rel="stylesheet" href="css/general.css"/>
<title>EC_add_to_cart | EC_test</title>
</head>
<body>
<!-- Google Tag Manager (noscript) -->
<noscript><iframe src="https://www.googletagmanager.com/ns.html?id=GTM-WKLP4D3"
height="0" width="0" style="display:none;visibility:hidden"></iframe></noscript>
<!-- End Google Tag Manager (noscript) -->
<h1>ECテスト add_to_cart</h1>
<p>
<a class="add_to_cart" href="cart/cart.html"><strong>Donut Friday Scented T-Shirt</strong>をカートに入れる</a>
</p>
</body>
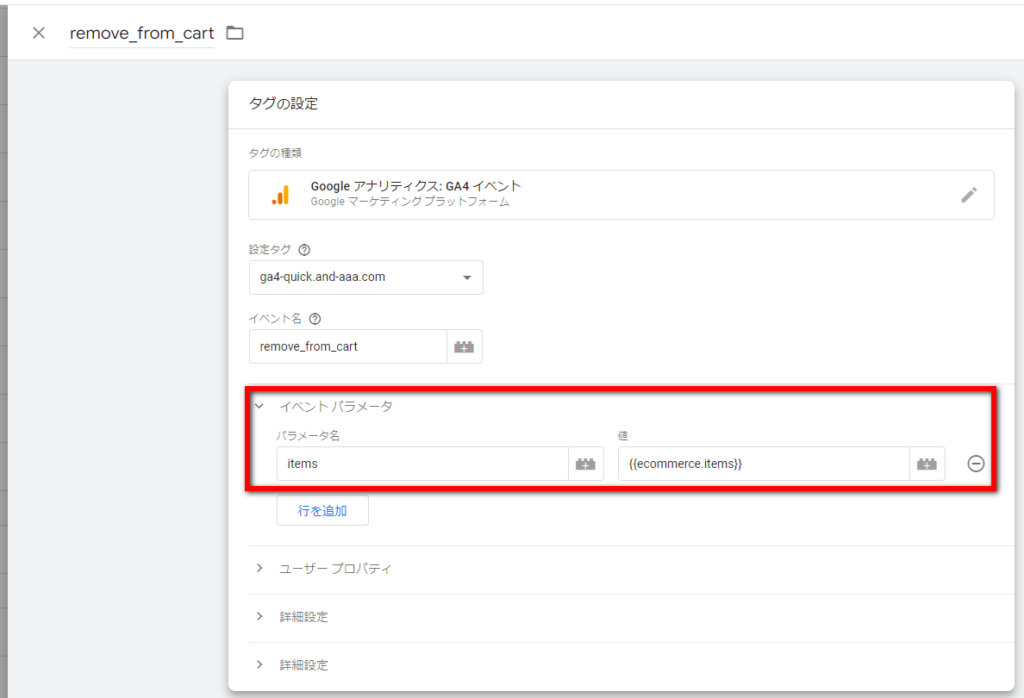
</html>8. remove_from_cart GTMイベント設定
変数とパラメータの設定が必要だった時は、add_to_cartのイベントタグの設定は上記にようになっていました。
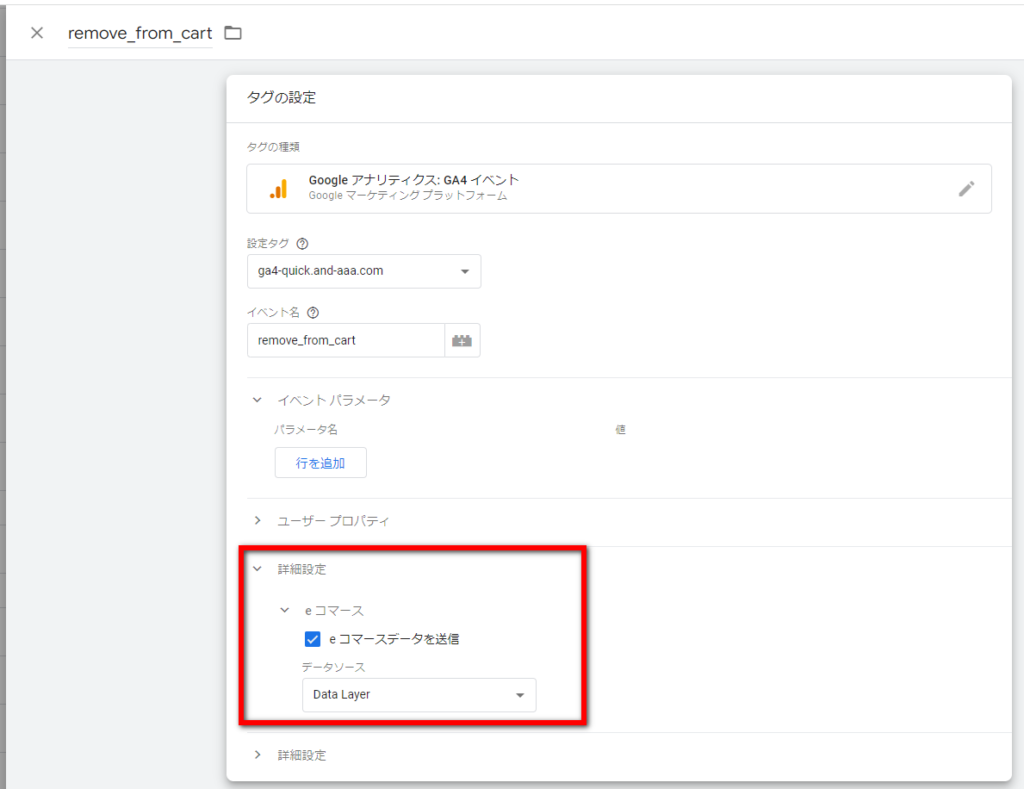
(繰り返しになりますが、)現在の設定方法では、Google推奨のeコマースの変数を使っていれば、変数の設定が不要となります。また、イベントタグに「イベント パラメータ」を記述する必要もありません。「e コマースデータを送信」にチェックを入れて、データソースは「Data Layer」を選択します。
イベント remove_from_cart のトリガー
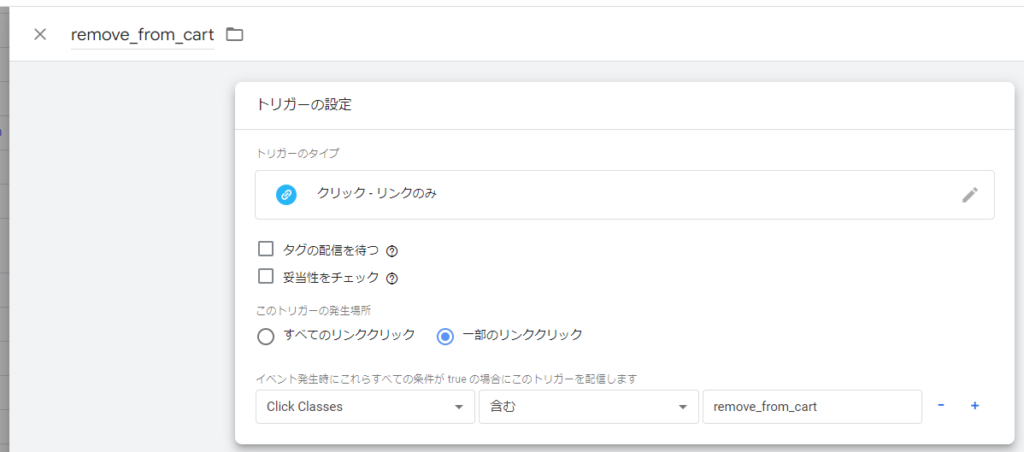
トリガーは「クリック – リンクのみ」を使用しています。
トリガーの「Click Classess 等しい remove_from_cart」の「remove_from_cart」は、下記のremove_from_cartのHTMLのソースのサンプルに記述してあります。
「remove_from_cart」のdataLayerのサンプルは下記の通りです。
<script>
window.dataLayer = window.dataLayer || [];
// Measure the removal of a product from a shopping cart.
dataLayer.push({ ecommerce: null });
dataLayer.push({
  event: "remove_from_cart",
  ecommerce: {
    items: [{
      item_name: "Donut Friday Scented T-Shirt 20220829_0933",
      item_id: "ii20220829_0933",
      price: 10000,
      item_brand: "Google",
       item_category: "Apparel",
       item_category2: "Mens",
       item_category3: "Shirts",
       item_category4: "Tshirts",
       item_variant: "Black",
       item_list_name: "Search Results",
       item_list_id: "SR123",
      index: 1,
      quantity: 1
    }]
  }
});
</script>
9. begin_checkout GTMイベント設定
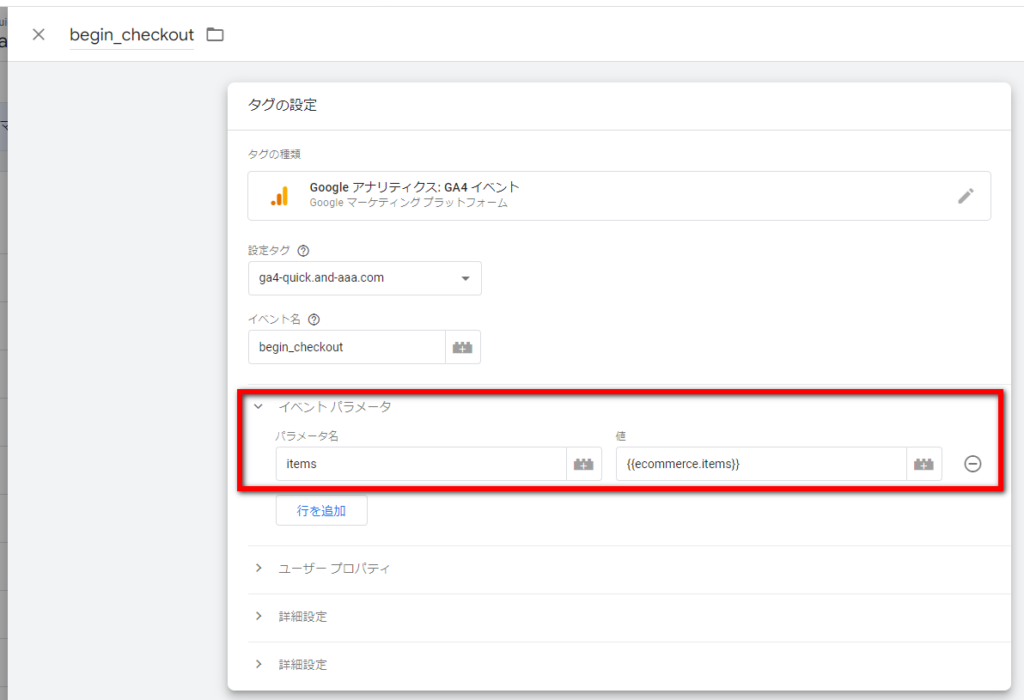
変数とパラメータの設定が必要だった時は、begin_checkoutのイベントタグの設定は上記にようになっていました。
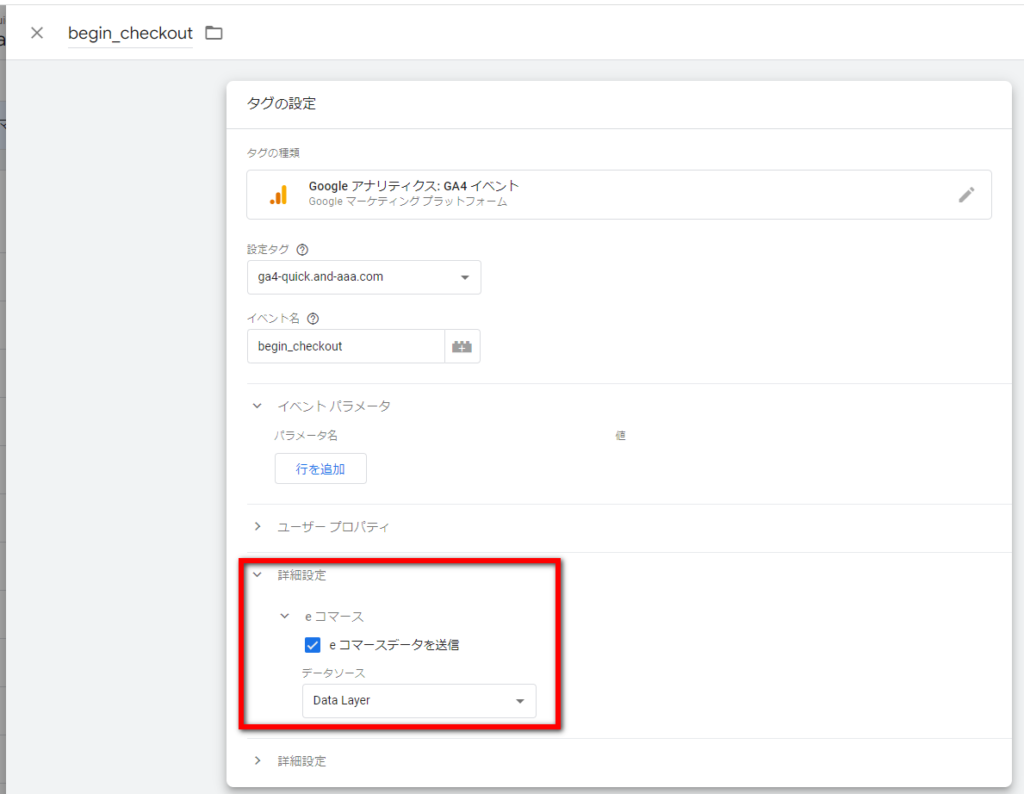
(繰り返しになりますが、)現在の設定方法では、Google推奨のeコマースの変数を使っていれば、変数の設定が不要となります。また、イベントタグに「イベント パラメータ」を記述する必要もありません。「e コマースデータを送信」にチェックを入れて、データソースは「Data Layer」を選択します。
イベント begin_chekout のトリガー

トリガーは「クリック – リンクのみ」を使用しています。
トリガーの「Click Classess 含む begin_checkout」の「begin_checkout」は、下記のbegin_checkoutのHTMLのソースのサンプルに記述してあります。
「begin_checkout」のdataLayerのサンプルは下記の通りです。
<html lang="ja" >
<head>

<script>
function onCheckout() {
  window.dataLayer = window.dataLayer || [];
  dataLayer.push({ ecommerce: null });  // Clear the previous ecommerce object.
  dataLayer.push({
    event: "begin_checkout",
    ecommerce: {
      items: [{
        item_name: "Donut Friday Scented T-Shirt",
        item_id: "ii20220829_0933",
        price: 10000,
        item_brand: "Google",
        item_category: "Apparel",
        item_category2: "Mens",
        item_category3: "Shirts",
        item_category4: "Tshirts",
        item_variant: "Black",
        item_list_name: "Search Results",
        item_list_id: "SR123",
        index: 1,
        quantity: 1
      }]
    }
  });
}
</script>

<!-- Google Tag Manager -->
<script>(function(w,d,s,l,i){w[l]=w[l]||[];w[l].push({'gtm.start':
new Date().getTime(),event:'gtm.js'});var f=d.getElementsByTagName(s)[0],
j=d.createElement(s),dl=l!='dataLayer'?'&l='+l:'';j.async=true;j.src=
'https://www.googletagmanager.com/gtm.js?id='+i+dl;f.parentNode.insertBefore(j,f);
})(window,document,'script','dataLayer','GTM-WKLP4D3');</script>
<!-- End Google Tag Manager -->

<meta charset="utf-8" />
<link rel="stylesheet" href="css/general.css"/>
<title>EC_begin_checkout | EC_test</title>
</head>

<body>

<!-- Google Tag Manager (noscript) -->
<noscript><iframe src="https://www.googletagmanager.com/ns.html?id=GTM-WKLP4D3"
height="0" width="0" style="display:none;visibility:hidden"></iframe></noscript>
<!-- End Google Tag Manager (noscript) -->

<h1>ECテスト begin_checkout</h1>


<p>
<a class="begin_checkout" onclick="onCheckout()" href="purchase.html">チェックアウトプロセスを開始する。</a>
</p>

</body>
</html>
10. refund GTMイベント設定
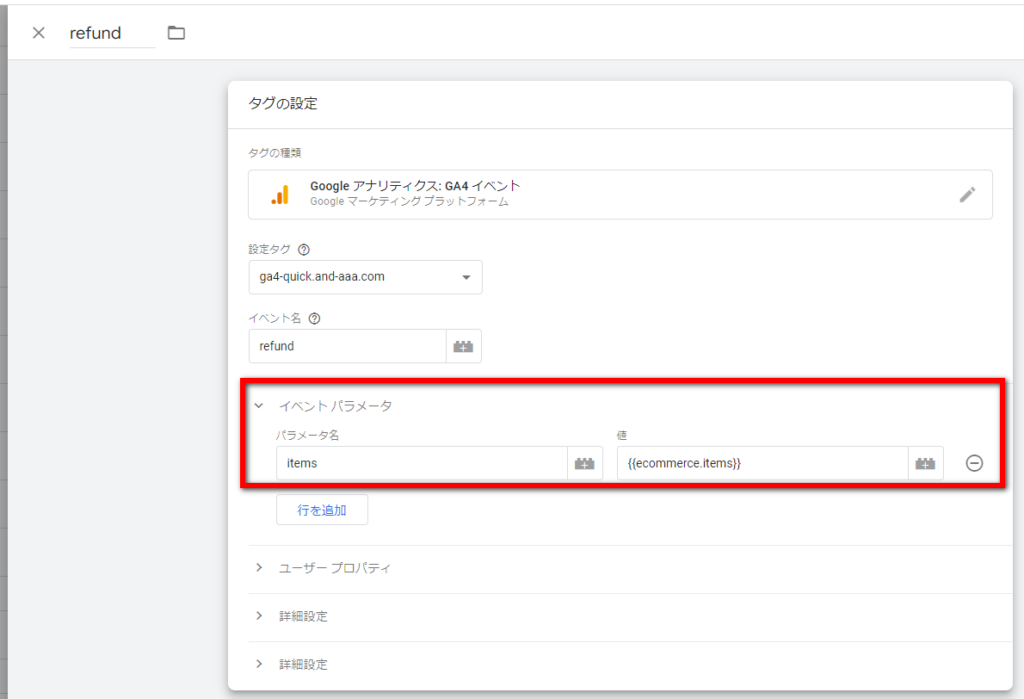
変数とパラメータの設定が必要だった時は、refundのイベントタグの設定は上記にようになっていました。
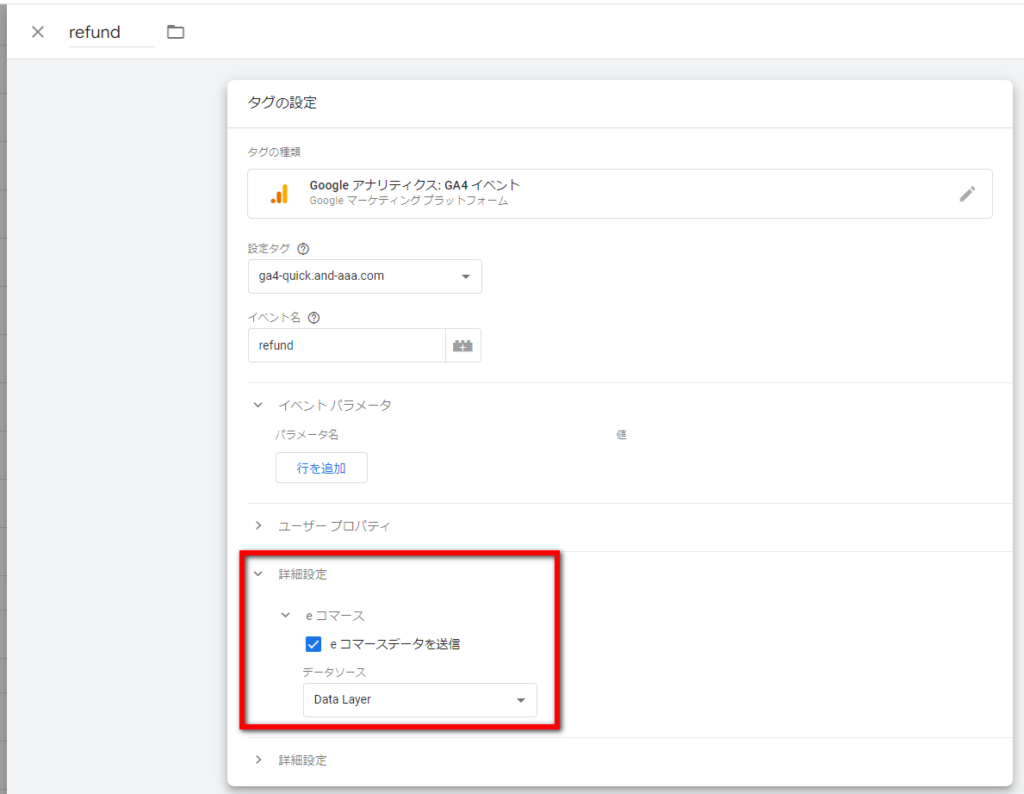
(繰り返しになりますが、)現在の設定方法では、Google推奨のeコマースの変数を使っていれば、変数の設定が不要となります。また、イベントタグに「イベント パラメータ」を記述する必要もありません。「e コマースデータを送信」にチェックを入れて、データソースは「Data Layer」を選択します。
イベント refund のトリガー
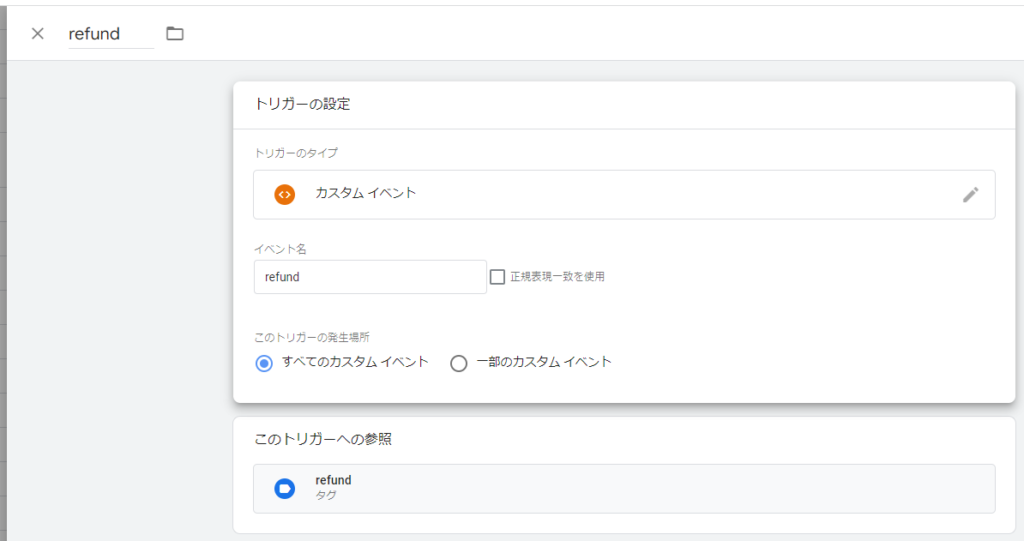
トリガーは「カスタム イベント」を使用します。
「refund」のdataLayerのサンプルは下記の通りです。
<script>
window.dataLayer = window.dataLayer || [];
dataLayer.push({ ecommerce: null });
dataLayer.push({
  event: "refund",
  ecommerce: {
      transaction_id: "20220830-1350", // Transaction ID.
      items: [{
        item_name: "Donut Friday Scented T-Shirt",
        item_id: "ii20220829_0933",
        price: 10000,
        item_brand: "Google",
        item_category: "Apparel",
        item_category2: "Mens",
        item_category3: "Shirts",
        item_category4: "Tshirts",
        item_variant: "Black",
        item_list_name: "Search",
        item_list_id: "SR123",
        index: 1,
        quantity: 1
      }]
  }
});
</script>
コメント